Narrow Gauge Baldwin OOn3 kit
Tom Cunnington
4th July 2020
4 minutes

I’ve always had a bit of an interest in narrow gauge as being different and some of the layouts I’ve seen over the years. In a rash moment a few years ago I bought a kit for a loco at a model railway exhibition and this describes the build. It’s not a super detailed model, but shows I hope that it’s an achievable project.
The kit is from A1 models who I don’t think have their own website, but can be seen are some exhibitions They are also available through Dundas Models and on eBay as user a1models-doncaster . For no rational reason other than perhaps a visit to the Tralee and Dingle railway some years ago when the short section of the line was operating as a heritage railway, I thought I’d try the slightly wider 3′ gauge rather than the more commonly modelled 2′ gauge. I can see why 2′ modelling is more popular – it’s got the simplicity of using the commonly modelled scale below’s components. For example N gauge wheels and track for 009 and OO gauge bits for “0-16.5”. However 3′ gauge in 4mm scale means using TT gauge components which, whilst not as common, at least has enough support to make it achievable.
The kit is designed for a Farish Class 08 shunter chassis, but is large enough to be adapted to 3′ gauge. I took an easy route and bought used a commercially made Bullant motor bogie – these are well designed and rugged units I’ve used in EM gauge in industrial shunters. The price has gone up, but I suspect no more than the comparable Class 08 would cost now. However the owner of Hollywood Foundry has retired and the last few seem to be selling out on websites like motorbogies.com.
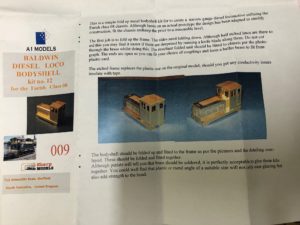
The instructions are simple but I don’t think they need to more complex, and the etch itself and well designed and produced. They don’t teach you how to solder, but that’s a different subject.
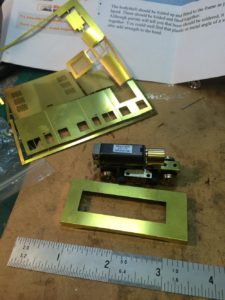
The only significant issue to consider was cutting out a larger hole in the floor to enable the Bullant to fit which was straightforward. The instructions suggest the parts can be glued together – I think that’s unlikely to work as the brass is thin. This one is soldered, using mainly 145 degree solder with plenty of flux. I used a small chisel tip on a 50w temperature controlled iron set at about 300 degrees, so I could go in fast to get the heat on the joint. This enables a good joint before the heat has time to spread too far. There was a fair amount of cleaning up afterwards in some places. The thin brass becomes much stronger as it builds into a box, and I’m delighted that there were no issues fitting the elements together. Of course it was washed at the end to remove the flux.
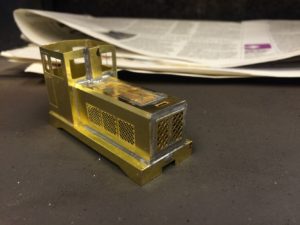
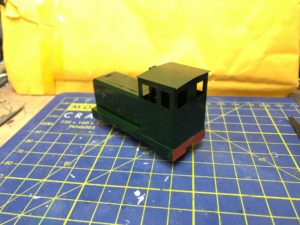
A quick run on the test track proved it worked, but was light and bounced. Next stop though was painting, using a green that I had to hand. The body was given a good clean with Cif, primed with Halfords grey primer rattle can, and a Brunwsick green. It may be a bit dark, but I think with some black applied around the grills weathering will look better. The roof is lightly glued in place to enable glazing and and interior cab painting later.
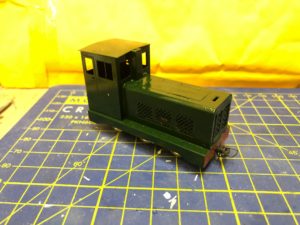
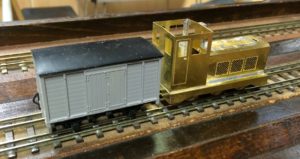
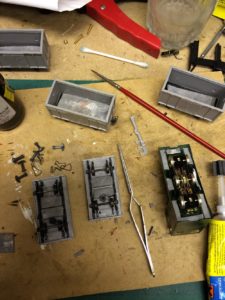
Once I had painted the body, I lightly glued the motor into place. I then filled the space around the Bullant with lead (seen here on the right – with some plastic wagon kits in build on the bench).
A further run on test track was much more stable.
I don’t have a layout to run this on at the moment, but it was an interesting diversion. The kit itself is perhaps a good opportunity to practice soldering on a straight forward project.
You may also like...
Thursday Track Nights
We are open on Thursday evenings from 7pm to 9pm at our Keen House clubrooms. Visitors are welcome, please come along and introduce yourself.
Address:
Keen House, 4 Calshot Street, London, N1 9DA
Become a member