Getting Dirty – The Art of Weathering
David Coasby
30th July 2020
10 minutes

I suppose of all the model railways skills I may, or may not have, weathering rolling stock is probably my best and certainly the one I get the most enjoyment and satisfaction from.
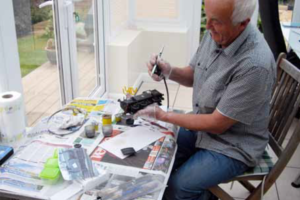
All set up in my new conservatory! Bill Water’s M7 mentioned in the article gets the air brush treatment with my new compressor and airbrush. Note the use of disposable gloves, this helps avoid finger marks on the model. Also, right there in front of me is a photograph of the prototype – something that is a must. I don’t yet have an air extractor, so yes… the end doors and windows are open! Photo: Glynis Coasby
Early steps
Although I’m now rapidly approaching retirement age (that is if anyone can afford to ‘retire’ these days) I have been dabbing paint and gunge on my models ever since my first layout at the age of 13. I remember all those years ago looking at pristine Hornby or Triang locos and thinking somehow there was something about them that just didn’t look real. About the same time, in the early 1960’s, I was an avid train spotter and most of what I saw on British Railways were locos and stock that was frequently grimy and run down. But I accepted this as the norm and didn’t even give it a second thought. But then I realised that was the ‘secret’ – the look of the 00 models I was buying at the time were far too clean. So I started experimenting. I didn’t want to completely lose the original paint job but somehow wanted to add some ‘dirt’. Luckily I hit on an idea that has become commonplace over the years, but at the time I wasn’t aware of anyone else ‘ruining’ their lovely and pristine models like I was about to. Basically I dabbed them all over with some White Spirit with just a tiny amount of Humbrol Matt Black added in and let the ‘dirt’ run into all the cracks then let it dry. That was it. Just Matt Black and White Spirit; no other colours; no other techniques. For me at the time it did the trick. My models began to look more realistic.
Building on basics
But the dirtying up of my models never evolved beyond that primitive early stage. Girl friends, marriage and family took priority and model railways were put on the back burner. Many years later I started back in OO gauge and again experimented with the overall finish of my models, developing further techniques and learning from other like-minded modellers. It was my move to O gauge in the 1980’s that really focused my desire to investigate all possibilities available to achieve the ultimate look and realism to my stock. My basic technique from all those years ago remained, however I used more colours and once the model was dry I’d use an almost dry brush to add in highlights. Later still I also began to use weathering powders when they were introduced and got some great results. By then I was also admiring some of the airbrushing done on some models seen in the model railway press and decided this had to be my next move.
Transition to air
Luckily, about ten years ago, I was given an ancient compressor from a commercial artist who was retiring, and an even older airbrush. But both worked OK and over the years I’d use all the techniques I had learned, including airbrushing, to get what I considered to be a good result on my models. I also read a great deal about what other modellers were doing and how they did it. Some were good – some brilliant; but some I considered their weathering was excessive. Probably the most important thing I ever learned was ‘paint’ what you see, not what you think you see. Always have a photo of the prototype in front of you whenever possible (or a similar prototype), and know when to stop! I rarely finish a model in one session.
It’s best to do the main work then set it aside to dry. Remember colours change once they dry. Also, as I mentioned before, it’s so easy to overdo it, though this can usually be wiped off at the time if it occurs. Even doing this can sometimes result in some good effects. However I don’t want this to turn into an A, B, C article on how to weather a model. There are plenty of good articles in magazines and books out there if you want to find out more (check out the MRC library). The thing is don’t be afraid to experiment. Don’t start on an expensive loco, try an old truck first or even some scrap plastic or card {there are quite a few excellent bargains in the club online shop that make good donors…}
LNER or Southern?
I mentioned earlier my using an old airbrush and gradually building up my skills. Eventually this faithful old beast died and at first I tried to continue weathering without it, but realised how much it had become such an important part of my ‘tool kit’ so somehow or other I had to replace it. “That ’s a strange looking loco!” Friend and fellow MRC member Bob Smith had purchased a second hand LNER 0-4-4T. One evening he brought it into Keen House to show us. As far as we could tell it was an old CCW cast kit on a rigid chassis painted in lined LNER black. But something worried us all. What class was it? We already had an ex-LNER class G5 0-4-4T on Happisburgh and it looked nothing like that, in fact nothing that anyone could recognise… then it dawned on us.
It looked very much like a Drummond design… in fact it had obviously started life as a Southern M7 but had been modified and painted in LNER livery! Having discovered that the loco wasn’t now suitable for service on Happisburgh and with problems with its running Bob decided to take it to bits to see if he could improve it. But it stayed in bits for some time until Bob realised that fellow MRC member Bill Waters was interested in it, with the potential to bring it back to life as a BR(S) M7 for his own ‘Weston Bay’ Southern/Western layout at home.
Bill stripped the body and parts like condensing pipes. The bunker rails were also removed and changed to Southern style and lots of LSWR fittings from his spares box plus crew etc. were also added. The chassis had the wheels replaced with Slaters, the leading axle now has sprung hornblocks and the bogie modified to take split axle, which has cured the running problems. So he finally ended up with a Southern loco that looked far more like it should, but still in LNER livery.
Painting
Once Bill had applied a coat of plain BR black paint, and following my recommendation, Bill then approached Liz Marsden of Cromford Designs fame (www.cromforddesigns.co.uk) to line and letter the loco. Despite Liz working in Yorkshire the loco was returned very promptly and very much to Bills satisfaction. But it was all clean and pristine! I think you can all guess the next bit…? “Dave, will you weather my M7?” I already owed Bill a big favour, as he’d put a new motor and gearbox into my kit-built O gauge ‘Terrier’ as it had always run hot since I first built it. So when he asked me if I’d weather the Southern M7 I could hardly refuse. And what a great opportunity to try out a new compressor and airbrush I’d just bought following Bill’s recommendation. If I ruined his loco it would be all his own fault!
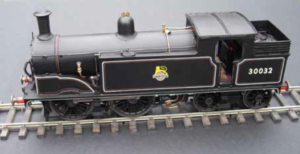
The ‘clean’ M7 fresh from Liz Marsen of Cromford Designs. Photo: Dave Coasby
ROHS AS186 Compressor and Airbrush special offer
A while ago some of the modelling magazines had been carrying an ad for a Compressor and Airbrush package for about £140. At first I dismissed this, as I felt that for that price the quality wouldn’t be very good – wrong. Bill had jumped in head first and already bought one. After examining it at Bill’s home I was convinced that I too had to have one. Bill was attending an exhibition the following weekend and offered to bring one home for me, thus saving on the delivery cost. Needless to say I was delighted with my purchase. At first I couldn’t believe what value for money it was and how much better and easier it was to use than the one I had been using previously. In particular the compressor was almost silent in operation and quickly built up sufficient air pressure which it stored in its own reservoir. It was so efficient that the motor rarely cut-in again to replenish the air throughout the whole session of weathering the M7.
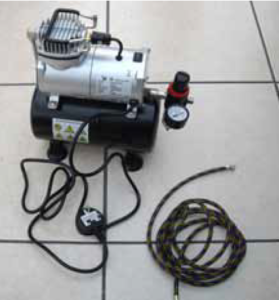
What you get for your money, the main ROHS AS186 Compressor with its very generous long Air Pipe.
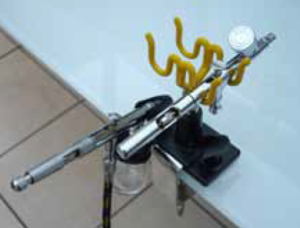
Also included in the price is this handy Stand that clamps onto the edge of a desk or workbench. As you can see it can hold two airbrushes at once. The airbrush on the left, connected to the air line and with the glass reservoir is the one that comes with the kit, so overall I think something of a bargain. Interestingly the airbrush on the right was a ‘free’ gift from Warners when I re-subscribed to British Railway Modelling one year. Another bargain, considering it came with a DVD and some books. Photos: Dave Coasby

Bill wanted a late 1950’s Southen Region ‘well-used’ look for the M7. Although the airbrushing played a significant part in the overall effect I have achieved here, there was still a lot of other techniques deployed, even ‘borrowing’ some of my wife’s clear nail varnish to simulate spilt water around the fillers on top of the side tanks. Photo: Dave Coasby
From Brush to Air
Following my usual weathering techniques described earlier I had set the loco aside to dry thoroughly. Now for the airbrushing to add that extra ‘something’ that is very hard to replicate with a brush. I felt confident enough to literally steam straight in (well, almost, just a few small tests on a piece of old white card first) and I was off, airbrushing the grime and soot effects that are so typical of the average steam loco.
The airbrush supplied as part of the package is ‘dual-action’ which is something cheap airbrushes don’t have. Basically as you gently depress the control button down it gradually releases air. Then, gently ease the button back at the same time and it begins to dispense paint. The harder you press the button down the greater the force of air; the further back you press the button the more paint. Simple really, but very effective and after playing around with it, quite quickly mastered.
Getting the proportions right
Mix your paint with it’s appropriate thinning agent (as I normally use enamel paint I use ordinary White Spirit). Mixing again is something you learn with experience, but generally paint from the tin is too thick, so needs to be diluted to go through the tiny, tiny aperture in the needle of the airbrush. Better to be too thin than too thick. Always begin spraying a short distance to one side of the model then slowly move back and forth with gentle sweeps but don’t get too close either. Practice makes perfect. The mistake most newcomers to spraying make is to keep spaying too long. If you do this almost inevitably the paint will start to run.
Have several goes at each surface – it quickly dries enough to receive the next coat – be patient! With this new easy to use airbrush everything went perfectly and I once again set the loco down to dry. I sometimes leave models in a box to keep dust away. For Bill’s M7 project time was against me as I’d agreed to take the finished loco up to the O gauge show at Telford which was only a few days away, where Bill was to meet me. Fortunately it was a lovely warm day and in my conservatory where I was working the model quickly dried. The next day a little more dry brushing and dusting with weathering powders got me to a result I was more than pleased with (see above) and the loco was delivered on time.
Why buy an Airbrush and compressor ?
The whole point of this article is to persuade anyone thinking about painting and/or weathering any models to buy an airbrush and compressor. Taking the last item first, don’t be tempted to try to save money and buy compressed gas bottles. They’re useful in an emergency, but don’t last very long and work out extremely costly if used regularly.
Care of your airbrush
Although you don’t need a huge amount of air for the airbrushing itself there is one thing that will use a lot of air and is one of the most important things you must do. That is cleaning out the airbrush after each use, or even if you are leaving it for just a few minutes. It’s vital you clear all the paint residue out immediately you have finished. However this is quite simple. I drain any paint out of the reservoir and pour in a little Cellulose Thinner. I swill this around and throw it (carefully) away, then wipe round inside the reservoir with some kitchen tissue.
Pour some more Cellulose Thinners into the reservoir, re-connect to the airbrush and start to spray into something like an old cardboard box, ensuring you have good ventilation. Place a finger over the needle cap and blow a little air through to cause back pressure. This will dislodge any paint residue in the nozzle and further back inside where you can’t see. Cellulose Thinners is great at removing almost any paint within the airbrush but always ensure there is no trace of it once you have finished (easily done by just keeping the air flowing – it rapidly evaporates) as Cellulose Thinners and Enamel paints just DO NOT mix!
To help the cleaning process I also wiggle an old paintbrush around the nozzle while the Thinners is being expelled. If you notice the slightest trace of paint still being emitted repeat the process. Only very occasionally is it necessary to dissemble the airbrush for a thorough internal clean. I always use enamel paints, by various manufactures, because they don’t dry too quickly, but I have known many fine models painted using acrylic paint.
Is it worth it?
Airbrush painting really is easier than it looks. Possibly the most important factor is a matter of confidence. Like I said earlier, practice on some old bits and pieces first. The cost? Well, the package is equivalent to the price of a good 00 scale loco and I think well worth the outlay. If cared for it should last you years and as your skills grow you’ll become proud of your achievements. Quite simply your models won’t look ‘straight out of the box’… they will have an individual style and appear far more realistic
The article first appeared in Bulletin 464. Members can check out the archive online in the Members area.
You may also like...
Thursday Track Nights
We are open on Thursday evenings from 7pm to 9pm at our Keen House clubrooms. Visitors are welcome, please come along and introduce yourself.
Address:
Keen House, 4 Calshot Street, London, N1 9DA
Become a member