Renumbering a Hornby Bulleid Light Pacific – from Bude to Yeovil
David Coasby
8th May 2020
10 minutes

On the 75th anniversary of the first Bulleid Light Pacific rolling out of Brighton, here’s an article from our Bulletin archive about renumbering and detailing the Hornby model.
Some time ago fellow MRC member Ian Lamb and I discussed the possibility of converting the then new Hornby Bulleid Light Pacific into one that replicated how it looked for the 1948 Locomotive Exchanges. Ian sought my advice, because he believed (wrongly) that I was some sort of expert on that particular class of loco, as I owned an ’O’ gauge model of one. However, my
immediate reaction was quite positive in that I thought all Ian had to do was buy the Hornby loco which was available in Southern Malachite Green, then acquire a standard 4,000 gallon Stanier tender, which he would probably have been able to obtain second hand.
Somehow I ’volunteered’ to re-number the loco with BR numbers and replace the BR ’lion’ on the black tender with ’BRITISH RAILWAYS’. Ian wanted 34004 ’Yeovil’ for his model, as it was
this particular loco that travelled north of the border during the locomotive exchanges in 1948 to the Highlands, where he now lives. Incidentally ’Yeovil’ was driven by Jack Swain and fired by Bert Hooker at the time, and many years later I remember Bert came to the Model Railway Club on a couple of occasions and gave us most interesting lectures, which included many tales of the Light Pacific’s impressive exploits so far from home.
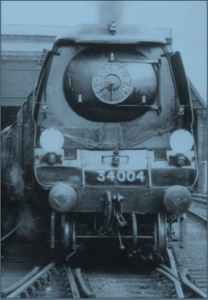
34004 ’Yeovil’ many miles from home prepares to leave Perth on 15th July 1948 during the BR Locomotive Exchanges. Photo: B Herbert
But back to the model. It wasn’t long before I did a bit of research and realised that all three Light Pacifics that were used in the locomotive exchanges (34004 ’Yeovil’, 34005 ’Barnstable’ and 34006 ’Bude’) were fitted with extended smoke deflectors. These were the only three to ever have these, so it brought us to our first major problem. The Hornby model was nicely painted and to fit
new longer smoke deflectors would have meant a completely new paint job – something I wasn’t too keen on, as it would also need a new lining job as well. My questions to Ian were “How many people would actually notice that the incorrect shorter ones had been left on the model?” Also, “If we decided to change them, were there any brass etches available to make this job easier, or would we have to fabricate new ones from brass or styrene sheet?” There were also an issue with slightly differing cab widths amongst the West Country class, but I chose to ignore that. About this time Ian wrote to Hornby telling them of his plan to ’marry-up’ one of their locos to a completely different tender. Amazingly within a year Hornby announced they would market a limited edition of the very same thing. Whether this was coincidence or whether Ian got them thinking we’ll never know. My initial reaction was “Good… now I don’t have to fiddle around with a 4mm loco and tender” (as those of you who know me will testify, I like my models to 7mm scale these days). When Ian and I both saw the pre-launch publicity for the new Hornby model we were both
delighted that they had gone to the trouble of producing it with the correct extended smoke deflectors.
Ian got his hands on one as soon as it was available and somehow I still ended up with the job of changing the numbers and nameplates as Hornby decided to produce 34006 ’Bude’ – but Ian was adamant he wanted 34004 ’Yeovil’. As soon as the box arrived in the post from Ian in Scotland I have to say I was extremely impressed with Hornby’s model. The last time I had my hands on a 4mm scale ’Light Pacific’ was my superdetailed Airfix model, which was fitted with a Kemilway chassis. I thought at the time she looked good too and had no trouble pulling 18 heavy coaches around the MRC test track back in the 1980’s. She’d have pulled quite a bit more given the chance, but no one else had any other stock available at the time. The Hornby model looks even better than my attempts at super-detailing all those years ago, but I’ve no idea if she can match the pulling power. Anyway, I digress. I’d heard from Tony Wright (Deputy Editor of BRM) and others that cabside numbers on Hornby models could be removed with the careful application of a fibre glass brush. I tried this very, very carefully over one digit and realised after just a few seconds it was starting to mark the surrounding paint. The other option I’d been told about was to scrape the old numbers off. I’ve used Swan Morton scalpels for modelling purposes for more years than I care to remember. I like to use number 10A blades – but everyone has their own preferences. I put a brand new blade into the handle and held the model with one hand while I again, very, very carefully began scraping with the very tip of the new blade – a tiny, tiny area at a time.
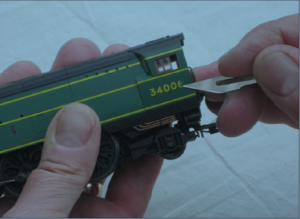
Gently removing the cab side number with a new and very sharp blade. Photo: Glynis Coasby.
An occasional sharp puff of breath to clear away the scrapings and gradually I could see this was giving me the result I wanted. The number ’6’ from the end of ’34006’ was eventually removed, leaving un-marked plain green paintwork. As I said, the secret is to use a brand new blade and go very slowly, lightly and carefully. Just to remove this one digit took nearly 10 minutes. Ian had already posted me some replacement cabside transfers and etched brass nameplate/smokebox door number plate for ’Yeovil’, produced by Modelmaster (www.modelmasterdecals. com). Unfortunately this covered the loco in a later period of it’s BR life. During the locomotive exchanges she was still in Malachite green livery with yellow lining, but carried her BR number in ’Southern Sunshine’ lettering style on the cabside and just above the front buffer beam. Although the etched nameplates
would be fine I got onto Fox Transfer’s website (www.fox-transfers. co.uk) and found just what I was looking for – ’Sheet number FRH 4401, 4mm scale Southern Sunshine Lettering’. As is usual with Fox’s excellent service, I received my package a day later and immediately held it up against the Hornby model. The numerals looked practically identical, both in size and style, which is what I had hoped for. This fact was going to save a lot of work, as all I had to do was replace the ’6’ on both sides of the cab and the one above the front buffer beam. If the Fox transfers had varied very much from the original Hornby numbers then I’d have had to replace the whole lot.
I won’t go into ’how to apply transfers’ here, as I’m sure it’s something most of you have done. Once fully dry I gave a quick puff of Railmatch Matt Varnish aerosol over each of the numbers, holding the can about 9” (300mm) from the model whilst carefully shielding the cabside windows with a bit of scrap paper. I then put the loco aside to allow the varnish to dry. The Hornby tender supplied in the box already had the correct ’BRITISH RAILWAYS’ nicely applied to its sides, so this was another job I didn’t have to do.
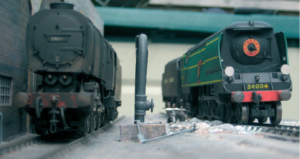
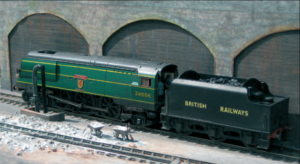
Another superb Hornby model, this time a Bulleid Q-1 0-6-0, stands alongside Bulleid Light Pacific 34004 ’Yeovil’ on Mike Joseph’s ’Sarum Road’ layout – the perfect location to replicate such an event. Photo: Dave Coasby.
The plastic coal did however look like plastic coal! I always keep a tin of crushed-up real coal for such occasions and took a small quantity to crush into even smaller fragments (mine was 7mm scale lumps – we needed typical 4mm scale ones). I drizzled some white PVA glue over the plastic coal in the tender and sprinkled some real coal onto it. But I knew from experience that this alone would not hold all the tiny fragments in place, so I mixed a little warm water, PVA glue and a dash of washing up liquid together and dabbed this mix all over the new coal load with an old paint brush. Although this initially makes the coal go white, it very quickly dries transparent and locks every grain of coal dust in place.
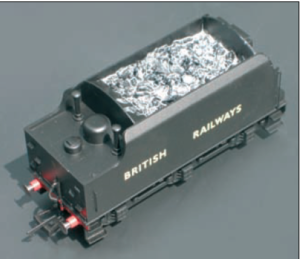
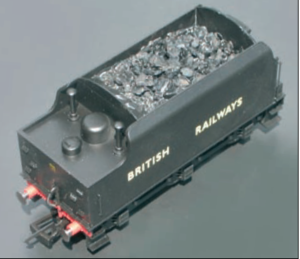
Some tender loving care! (sorry about the pun). Neat PVA glue is drizzled over the plastic coal and then real coal is sprinkled on top. Dilute PVA is then brushed over the coal and allowed to soak in. The PVA soon dries transparently, locking all the small granules firmly in place. Photos: Dave Coasby.
Hornby supply a ’Locomotive Super Detail Pack’. They recommend fixing these small extra plastic pieces with a drop of polystyrene cement. I tried this but found it didn’t secure them. Whether it was the brand of glue I used or more likely the type of plastic Hornby use I don’t know. It may have been easier to try Superglue, but I find this often dries out and the joint eventually fails, and examining the type of plastic used by Hornby I even had my doubts if Superglue would work either. So I decided to re-apply the fittings using good old reliable Araldite. It can be slow and messy if
you’re not careful, but there’s not many things it won’t stick together. In this pack Hornby also provide some white Southern-style route indicator discs. In prototype photographs I have seen of ’Yeovil’ in Scotland she retained her ’southern discs’ and used them in combination with the more usual BR lamps. On the model it would have been silly to try to glue the discs onto the top of the lamps without some further support – they would have simply been knocked off at the slightest jolt. I drilled down vertically into the two lower outer-most lamps with a tiny drill and glued a very
short length of wire into these holes. In the end I didn’t use the Hornby discs as they looked a little thick and were moulded from the same ’unglueable’ plastic. Fortunately fellow MRC club member Bill Waters had various diameter punches and knocked me out a few correct sized discs from thin styrene sheet. Once the short wires were set in place I glued the white discs to them.
The model driver and fireman (Jack Swain and Bert Hooker as they had now become) were supplied in plain black plastic, so a quick spray with Halfords Grey Car Primer was applied and they were set aside to dry. Some suitable enamel paint colours, applied with a tiny brush, were used a bit later to bring them to life.
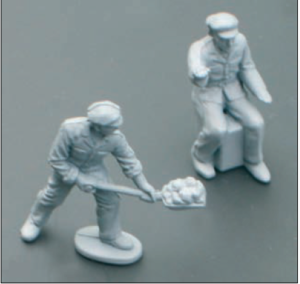
Bert Hooker & Jack Swain immortalised in plastic and having been spayed with grey car primer, but prior to detail painting. Photo: Dave Coasby.
I opened up the Modelmaster pack containing the nameplates. For ’Yeovil’ this comprised of three separate brass pieces for each side (just as the prototype), together with a transfer of the heraldic shield that had to be applied once the nameplate was in position. The etchings seemed so small compared to the 7mm variety I normally handle and I was fearful I’d mess them up cutting them off the fret. But I needn’t have worried, as they were beautifully produced and came away very easily with only the very minimum of cleaning-up necessary. I think it’s always wise to immediately put such tiny pieces in a small glass jar so that you don’t loose them. Then, when handling them, use tweezers and look through an eye-glass. I glued each piece in place on the side of the boiler, again using Araldite. Job done. Well, not quite. Nothing leaves my workshop without at least some weathering. As I said, I’d studied quite a few black and white photos of the Light Pacifics while they were on the locomotive exchanges. Although they all looked well kept, they earned their living whilst away from home and certainly weren’t kept spotlessly clean (there probably wasn’t time for much cleaning). So a light coating of extremely dilute matt black, track colour, grey etc. (frequently wiping away any excess with cotton buds) together with some weathering powder and a final light dusting with an airbrush, using mainly a mixture of white spirit, matt black and track colour gave me the final result I was looking for.
Bert Hooker and Jack Swain prepare ’Yeovil’ for her epic journey north. Photo: Dave Coasby.
In 12 inches to the foot scale, Ian had been looking forward to the planned visit of sister engine ’Manston’ to the nearby Strathspey Steam Railway during 2008 to celebrate the 60th anniversary of the Locomotive Exchanges. Unfortunately she couldn’t be got ready in time and no alternative Light Pacific was available. So for now Ian will have to make do with ’Yeovil’ running again in The Highlands, but this time in 4mm scale on his ’DAVA’ layout.
As it might well have looked sixty years ago. Only 24 hours after the previous picture was taken (thanks to the Post Office Parcelforce) ’Yeovil’ is seen storming up the bank on Ian Lamb’s layout in the Highlands of Scotland. Photo: Ian Lamb.
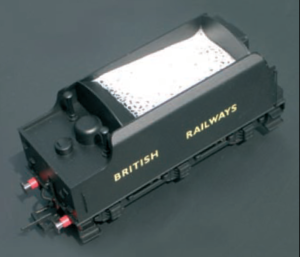
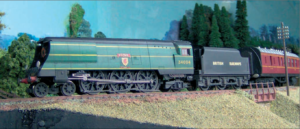
Details of the original Hornby model: BR 4-6-2 West Country ’Bude’ R2685. DCC Ready. Price: £111.00
During the locomotive trials of 1948 the then fledgling British Railways Board experimented with different locomotives to see how they performed on tracks outside their normal region. Part of the
trials was to try different combinations of locomotives and tenders which resulted in the classic pairing of Bulleids West Country ’Bude’ and a Stanier Tender. To celebrate the 60th Anniversary of not only the locomotive trials but the formation of British Railways, 2008 limited edition models of ’Bude’ coupled to a Stanier tender, complete with numbered certificate have been specially prepared and are presented in a commemorative pack.
This article first appeared in Bulletin 444. An archive of Bulletins for almost 20 years is available in the members section of the website. To find out about the benefits of joining the MRC, click here
You may also like...
Thursday Track Nights
We are open on Thursday evenings from 7pm to 9pm at our Keen House clubrooms. Visitors are welcome, please come along and introduce yourself.
Address:
Keen House, 4 Calshot Street, London, N1 9DA
Become a member