Sarum Road – Part 8 – Nearly There
Michael Joseph
2nd July 2020
8 minutes
Scenery II
O the joy of it! Finally beginning to fill in the bare bits!
I was going to use the sides of cardboard boxes for filling the bits of bare board between the cork underlay. I tried it out first with some scrim and Idenden (see below) and the water content (I think) of the Idenden just accentuated the corrugations of the cardboard – not a good idea. In the end, I just used more foamboard. Come the next layout, I might dispense with cork entirely, use foamboard instead as a soft layer direct on ply (after checking for shrinkage first – see the viaduct article!). The one possible downside is that in one of the mags recently someone had done just this and was now bothered about the noise. One to try out first.
More Ballasting
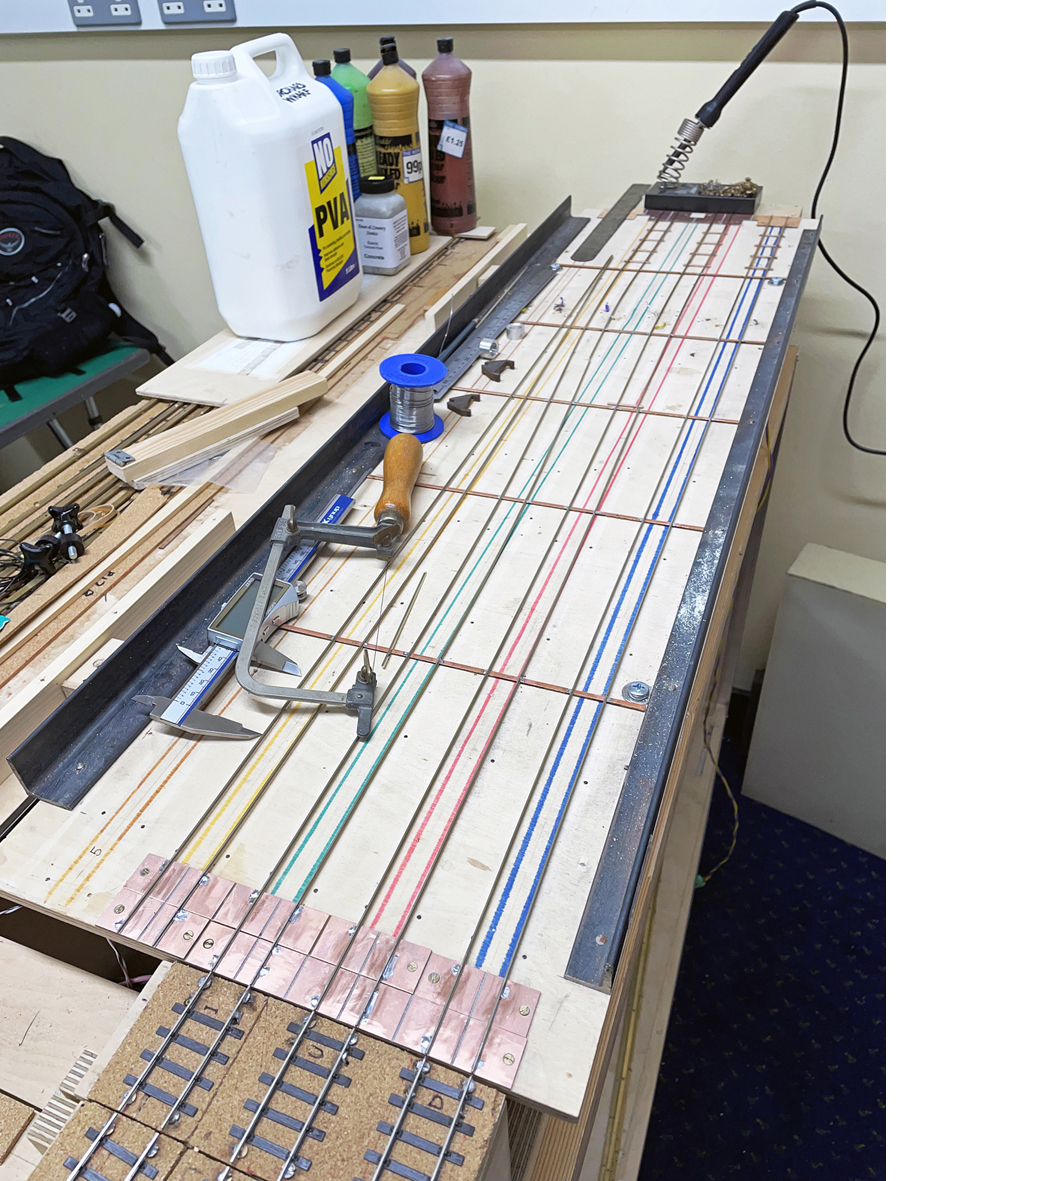
But first – ballasting track – a lot of it! Having never walked around a working steam shed in BR days and having only seen their preserved brethren, I spent a lot of time perusing photos and asking questions. In the last few years some very good colour albums have been published that sometimes include views of steam sheds in the 1950s. Very handy to get the colours right, there is a lot of grey and also quite a lot of brown/rust colour on the ground. Ballast is ash (at least in SR sheds), sometimes some cobbles (obscured by more ash) and allowing for the inevitable colour cast of some of the early photos, generally, light to mid grey in shade – usually the latter. So at this point there was a method to be determined for doing the track…
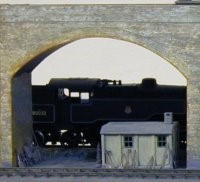
 The completed bridge
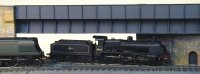
 Loco yard and Sarum Road Station
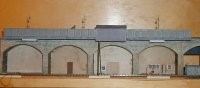
 Detail of yard – note the water column
The alarm went off one morning and in the doze before I hit the snooze button for the third time I thought: ‘Polyfilla’ and then to the subconscious floated ‘PVA’ and ‘Water’. That evening I tried a 50:50 mix of water and PVA, one large dollop of detergent and then added the Polyfilla to make a VERY runny, slimy mix. Black watercolour paint was added to create a grey runny, slimy mix. Using the Shesto syringe (see previous article), dropping large blobs of the mix between the sleepers – great – it works! Nice ash ballast. Now to do it on the real thing… Oh, and the drying time is overnight.
Detailing I
Some detailing was required before the ‘ground’ was laid (see next section). I had to fill in some of the arches with brickpaper on foamboard and some plywood structures, scribed to represent planking and with added details such as doors, windows, etc. Doors were fabricated from card or ply, the windows came from a set of window and door details by either Wills or Ratio (sorry, I forget which!). A SR concrete PW shelter was ‘planted’ under the arches – very slightly recessed into the card so that there is no join showing.
Modeller’s tip: If a building is placed directly on top of a surface there is always a black line where the walls meet the surface – the viewing angle is nearly horizontal and the gap will show. Pendon and others started the practice many years ago of extending the walls so that the building effectively has foundations, the ground then being built up to this level – no visible horizontal gap. This method also works (with care) when a building has to be made removable.
Detail of Permanent Way shed
Filling Gaps
Idenden – interesting stuff. It is made by Evode Limited (as in Evostick) and is a rubberised plaster. It comes in three ‘colours’, white, grey and black, BUT will mix well with emulsion paint so that any background colour can be mixed in. I found out about this material through a friend interested in amateur dramatics where it is used in the creation of backscenes and drops. The snag is that it is not cheap, but it goes a very long way – I will be selling pint sized containers of it at the next few shows to try and recoup the cost! Bring old milk cartons!
 Detail of yard
The gaps between the cork underlay were filled in with off-cuts of foamboard, card, paper – whatever came to hand really. Gaps were covered with plasterer’s scrim (obtainable from building suppliers) glued with a 50:50 mix of water and PVA and a dash of detergent. The foamboard is dead easy to sculpt into a ‘landscape’ ready for the Idenden.
As supplied, the Idenden is fairly thick and shows the brushstrokes. However, since it mixes with emulsion paints and water is used for cleaning, I believe that it is water based. That said, it does appear to ‘cure’ and is certainly water resistant. I tried a diluted sample on a bit of scrap. It worked so I applied a series of coats to build up the thickness and finally covered it with a very dilute mix of polyfilla (as above) to create a bit of texture. An overall grey was created with a very thinned down mix of white emulsion and black artist’s watercolour paint from Carey Stationers. With a bit of over-brushing in selected areas a variety of shades appeared.
Detailing II
Started by making some 4mm wheelbarrows from a kit. How do those people at Pendon do it? The kits worked in the end but for my short stubby fingers were almost impossible to get straight. Managed it eventually. Also prepared spades, pick-axes and so on for planting around the layout.
Two LSWR water cranes from Mike’s Models were prepared by drilling the column part and gluing a section of 3mm thread to hold them firmly down on the layout. As above, a recessed ‘socket’ was created for them. The hose was made from a black vinyl bin bag, wrapping some lead foil to make it hang and with some very light fishing line to pin it to the base and stop it flapping around in transit.
Station
The base is foamboard with a card overlay, sprayed grey with a number of washes of very thinned grey paint to give an uneven finish. Superglue was dropped in areas to create damp spots and puddles. Oh alright. I got a bit clumsy when sticking in the lampposts and decided to make a feature of it! The fencing was coloured and weathered in the same way.
There are Southern Railway roundel station signs on the lampposts. It is just possible to read Sarum Road. These came from a digital photo of one such sign with PaintShop Pro filling in the correct name. It also produced the layout nameboard the same way (see below).
There are (at the time of writing) only three figures on the platform and only two structures. Now anyone remember that first article? Many years ago (12 or 15?), at one of the MRC IMREX shows long gone, I started building small plywood buildings as a demonstrator. The shelter is the oldest part of the layout having been built as a demonstration piece all those years ago! There is planning for you!
 Sarum Road Station
For transit, the structure is held onto the baseboard, on its ‘back’ by elastic bands that are tied to eyelets (strategically located out of sight). Another elastic band and a bit of good old coat hanger support it when fitted into ‘showtime’ position. The figures are either glued on with an extension to one leg or by fishing line drilled and glued into the underside of the figure.
 Rear view of Sarum Road Station – note the wire and elastic support
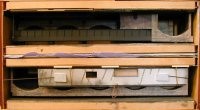 Baseboards in packed positions in the transport box. Note that the station is suspended upside-down, ie the white-ish panel
To finish the station I need to put a ramp at each end, fenced in properly. Also, the platform edge needs to be white – the remains of wartime safety measures – on paving slabs that need to be scribed.
As an aside, I started the station on the Saturday afternoon before a show and finished it by Tuesday evening. Fast by my normal standards and just about everything went right first time. Very satisfying.
Lighting
This article was to have been just about scenery and then an exhibition in September got in the way and I concentrated on the layout a bit, didn’t I? So it has advanced more than I expected when I started this article!
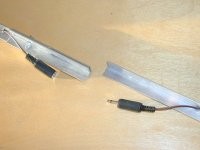
Take a halogen lighting kit from Maplin for a kitchen or similar – keep the transformer and bulbs. Next time I would chose a 100W kit (5 x 20W bulbs) instead of the 60W kit with just three. Take five 3mm ‘mono’ jackplugs and sockets from Maplin. Get arrested for shoplifting.
Take a couple of lengths of ‘L’ section aluminium from Apsley DIY. Get arrested again.
The frame is very simple and the photos probably explain it better. It can be erected at either end of the layout. There is a jackplug connection at each end of the top bar for power so that the lead can be hidden away at the back of the layout whichever configuration is used.
The top bar is in two pieces for easy packing and slide together as per the photo. The sockets are grounded to the bar and only one wire is required along the top to complete the circuit.
 Join in lighting bracket
The lights are held in place using the ceramic fittings supplied with the lighting kit and these came with two convenient 3mm holes. A bracket was made out of copper wire (from mains cable) and soldered to one leg of the jack plug. The light connections were made by soldering the wires to the bracket and to the other leg of the plug. The fascia is just card with a Sarum Road roundel printed onto it. The fascia is just deep enough to hide the lights so that spectators are not looking directly into them.
Parts and Supplies:
Paints and foamboard Carey Stationers – 179-181 St Albans Road, Watford, Herts. Tel: 01923-236302
Idenden Evode – www.evode.co.uk (supplied by Sheffield Insulations – www.seffins.co.uk, Unit 4, Victoria Road Retail Park, Crown Road, South Ruislip, HA4 0AF. Tel: 020-8839-4321)
Syringe Shesto – http://www.shesto.co.uk
Water cranes Mike’s Models, Holt House, Caswell Bay, Swansea. Tel: 01792-232264
Detailing bits Junction 20 Models, 51, High Street, Kings Langley, Herts. Tel: 01923-270247
Lighting Maplin Electronics – www.maplin.co.uk
Book binding screws: Binding Bazaar – www.bindingbazaar.com
Plasticard – Eileen’s Emporium, PO Box 14753, London, SE19 2ZH. Tel 020-8771-3366
You may also like...
Thursday Track Nights
We are open on Thursday evenings from 7pm to 9pm at our Keen House clubrooms. Visitors are welcome, please come along and introduce yourself.
Address:
Keen House, 4 Calshot Street, London, N1 9DA
Become a member